Published on 2026-02-21 in
Software
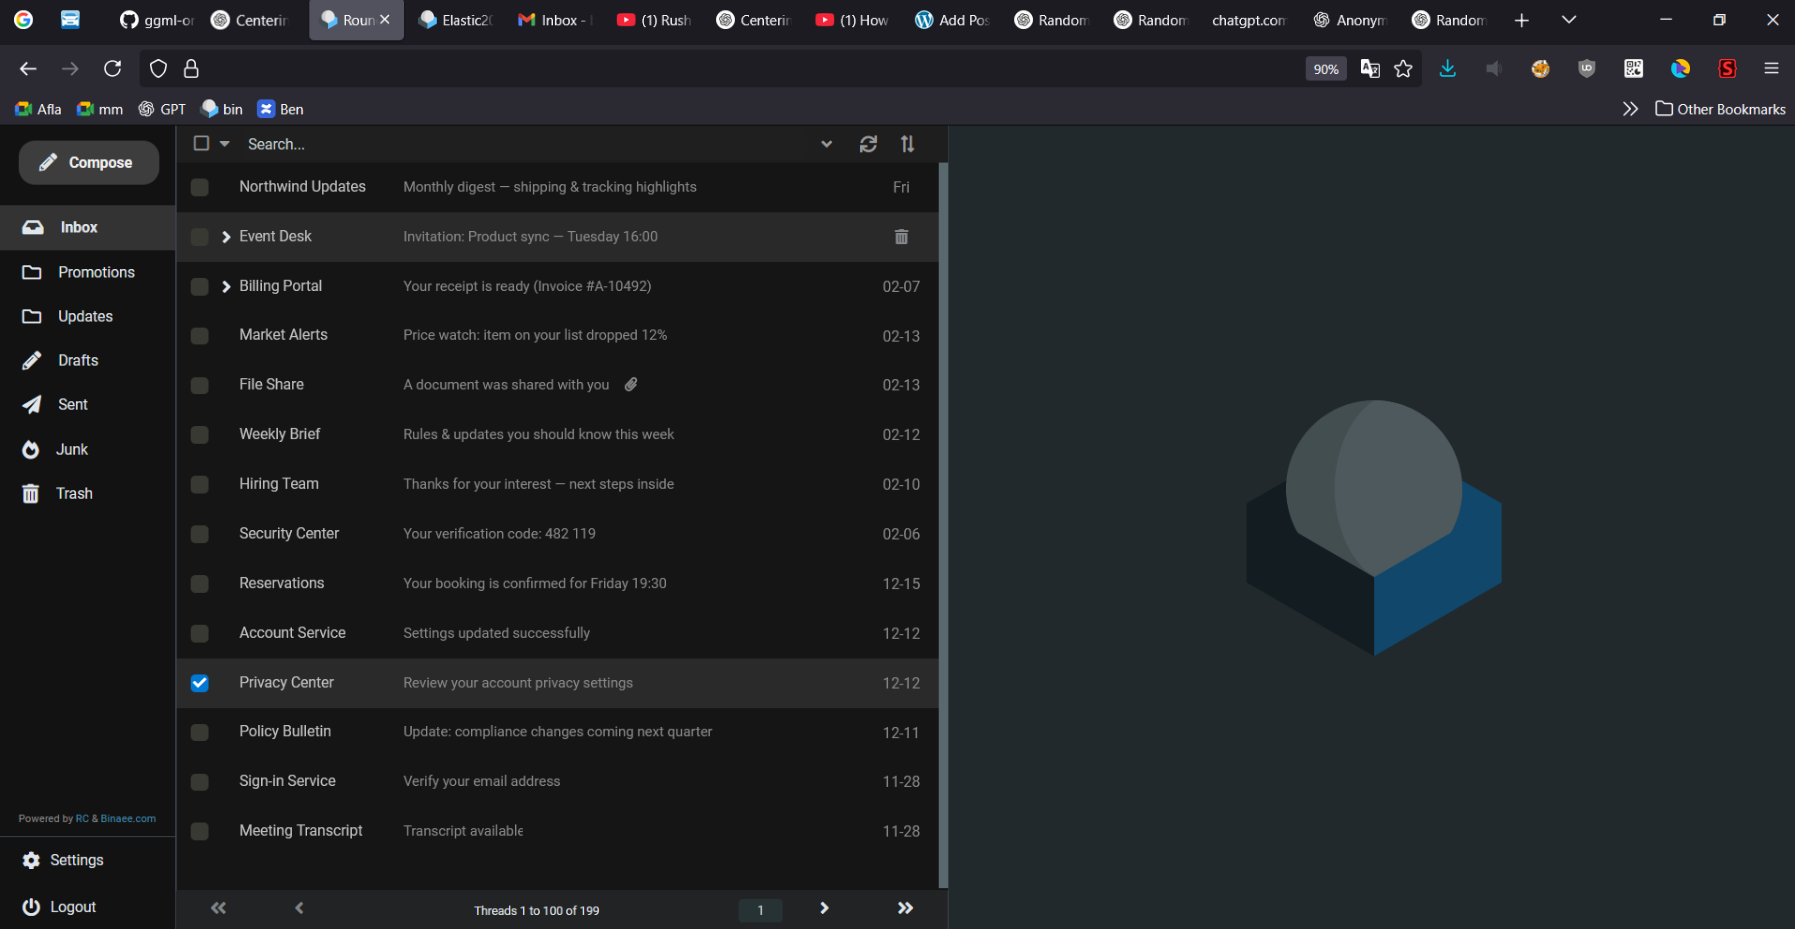
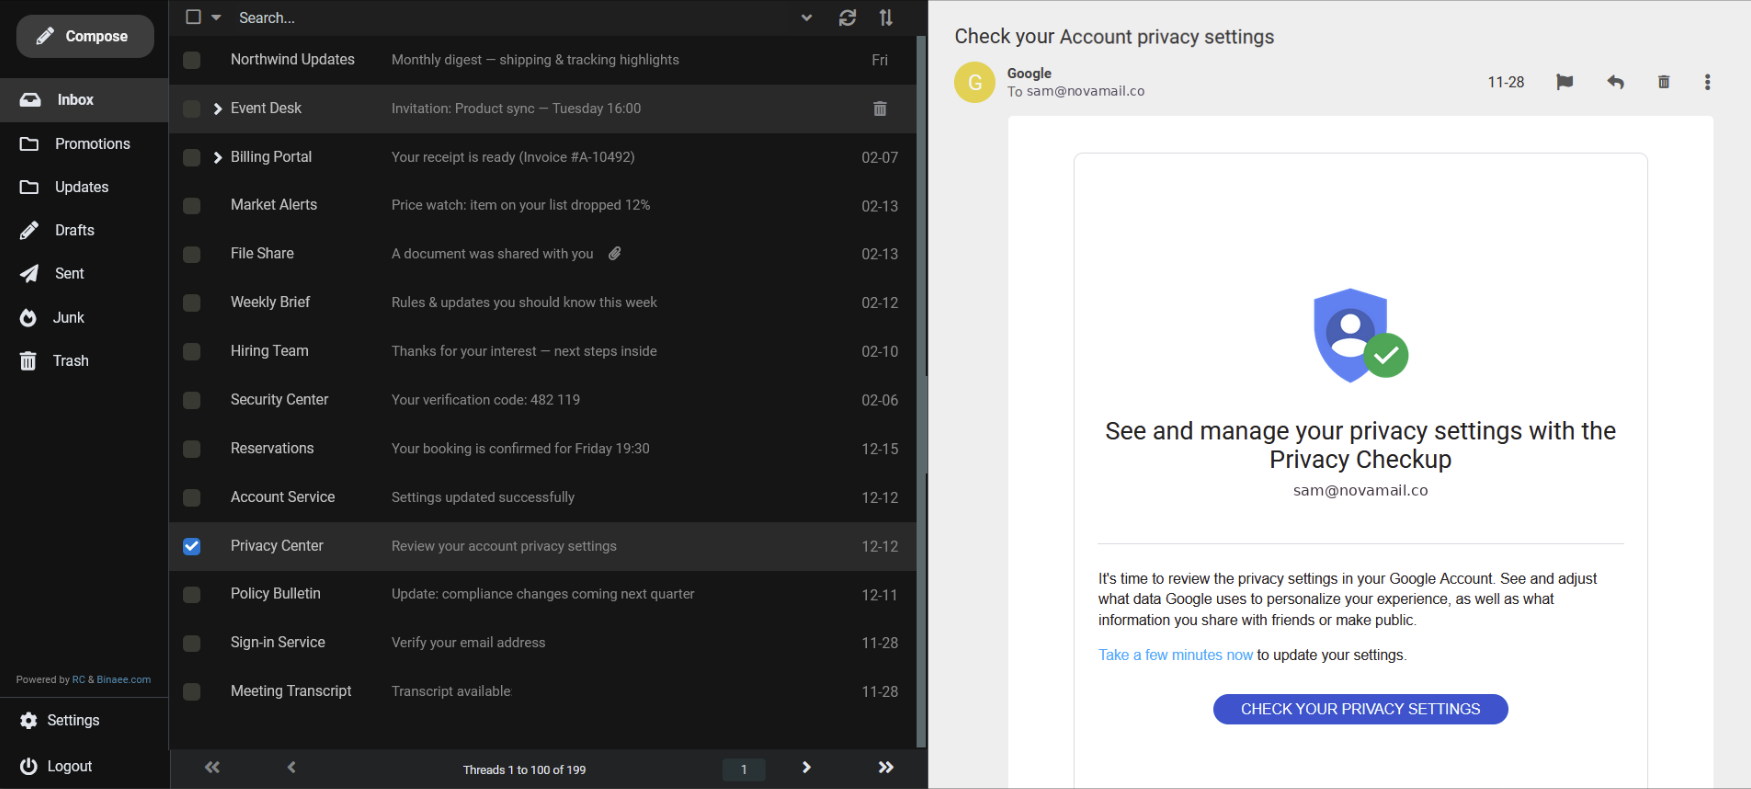
Elastic2025 is a dark Roundcube theme based on the Elastic2022 by Seb1k.
Gmail removed ability to pull messages from other providers as of Jan 2026. This project aim to offer a simple drop in replacement webmail experience in Roundcube (especially on desktop). Please consider donating if you liked it.
✨ What’s different
- More content on screen (reduced spacing/higher density)
- Less visual noise (cleaner, more premium look)
📸 Screenshots
🛠️ Installation
- Download the Elastic2025 Theme
- Copy all its content into Roundcube installation path inside skin folder. It should become then
<roundcube>/skin/elsastic2025/*
- Enable the theme by going into the roundcube
Setting>User Interface>Interface skin
- Follow the Tweaks guide to get the exact result as shown in the screenshots.
🐞 Known Issues
- Does not work on Android (for now)
- Icon issues on the Settings page and Compose/Send page
⭐ Why Now & Wishlist
Many features are missing, these require more time & effort and I work on them if the project get enough traction.
- Spell checking
- AI autocomplete
- Same page reply and draft
- Better thread handling in a same page
- Full-Width mail list -> transient to half only when clicked on a mail
- Simplify installation
- Simplify deployment
🤝 Support and Contribution
If you find a bug you can easily fix it by the browser inspector and editing the corresponding CSS file. If you like your fix to be merge into the main stream please don’t hesitate to create a pull request in the GitHub page and if it matches our style and test it will be merged.
If you notice a bug but you don’t have time to fix it or create the pull request please consider donating. We know the theme currently has many bugs and by donating even a small number you keep helping to fix all these bugs. The theme took almost 2000 hours to refine and publish, if that hours helps you save time, a small donation would be really appreciated.
Published on 2025-04-15 in
Software,
Speech Recognition
Requirements
1. VS C++ 2019
2. Nvidia Cuda Toolkit 12.1
3. SDL2
4. Whisper.cpp Source
5. Git
6. CMake
If your visual studio did not detected by the Nvidia Toolkit make sure to copy following directory content to the next one manually. You may need to adjust the path depending on your specific VS version.
C:\Program Files\NVIDIA GPU Computing Toolkit\CUDA\v12.1\extras\visual_studio_integration\MSBuildExtensions
C:\Program Files (x86)\Microsoft Visual Studio\2019\BuildTools\MSBuild\Microsoft\VC\v160\BuildCustomizations
You need to also install SDL2, this only required for streaming option. You have to install the SDL2, building locally and reference locally will cause the whisper compile process to fail.
cd SDL2
cmake -B build
cmake --build build --config Release --target install
Build
git clone https://github.com/ggml-org/whisper.cpp.git
cd whisper.cpp
cmake -B build -DWHISPER_SDL2=ON -DGGML_CUDA=1 -DWHISPER_BUILD_EXAMPLES=1 -DSDL2_DIR="SDL2/" -DCMAKE_PREFIX_PATH="SDL2/cmake"
- GitHub – Can’t build on Windows – No CUDA toolset found error
- LibSDL Wiki: SDL2 Installation
- Can’t build stream example on Windows
Published on 2025-01-06 in
Software,
Windows
C:\>powercfg /lastwake
Wake History Count - 1
Wake History [0]
Wake Source Count - 0
C:\>powercfg /devicequery wake_armed
HID Keyboard Device (004)
HID-compliant mouse (001)
HID-compliant mouse (003)
C:\>powercfg /devicedisablewake "HID Keyboard Device (004)"
C:\>powercfg /devicequery wake_armed
HID-compliant mouse (001)
HID-compliant mouse (003)
Published on 2024-07-25 in
Software
1. Point your domain address to a nameserver. Managing name server is difficult so usually you stick to something like cloudflare to both protect against DDoS and do the name server job.
2. You need to set the PTR Record or rDNS. both terms are the same and used interchangeably. There are 3 notes here:
- use FQDN.
www.domain.com is a FQDN, domain.com is NOT.
- PTR record should only return one FQDN and not more than that. otherwise spam detection might flag it as spam server
- The FQDN you set should not go through cloudflare proxy. in other word the PTR record you specify should directly point back to the server IP address. Thats why it is advised to not use
www.domain.com as PTR record and use something like mail.domain.com so in case of DDoS attack your website would not get compromise.
3. MX record connects a domain to a mail server and it is like a CNAME, so domain.com MX record would be mail.domain.com and the A record of mail.domain.com should point to the mail server ip address. Note that cloudflare does not allow all port to pass through and only allows http ports like 80 and 443 to pass, thus if you run a mail server you should disable cloadflare proxy on the specific sub domain.
4. A record redirect domains to server IPv4 , AAAA record is the same except its for IPv6, CNAME simply map one domain to the other
5. To send or forward email you need to take care of SPF, DKIM and DMARK
SPF: Specify what IP addresses are allowed to send emails from your domain.DMARC: Mention how the recipient mail server should treat mails that fail the DKIM verificationDKIM: is a public/private key signing mechanism to verify the email is coming from the authorized author
Published on 2024-06-11 in
Software
On Ubuntu 22.02. all apache config files are exist under available directory and you need to enable them by running a2ensite 000-default.conf
/etc/apache2/sites-available/000-default.conf
--------------------------
<VirtualHost *:80>
    ServerAdmin webmaster@localhost
    DocumentRoot /var/www/html

    ErrorLog ${APACHE_LOG_DIR}/error.log
    CustomLog ${APACHE_LOG_DIR}/access.log combined

    # Permissions settings
    <Directory /var/www/html>
        # Allow access to the directory and its content
        Options Indexes FollowSymLinks
        AllowOverride All

        # Allow only certain methods for security
        Require all granted
    </Directory>
</VirtualHost>
For subdomains
Published on 2024-06-04 in
Software
1. Create user, -m means create no home dir.
useradd -M <username>
2. Create ssh-key, -C is specifying the comment.
ssh-keygen -t rsa -b 4096 -C "<comment>"
3. Download private key and put it in .ssh folder on client side.
4. Move public key to /etc/ssh/authorized_keys/.
5. Set permission.
chown <username> /etc/ssh/authorized_keys/<username>.pub
chmod 644 /etc/ssh/authorized_keys/<username>.pub
6. Edit sshd_config
vim /etc/ssh/sshd_config
------------------------
Match User <username>
AuthorizedKeysFile /etc/ssh/authorized_keys/<username>.pub
due to complication permission thing only use the etc folder
Published on 2024-05-21 in
Software,
Speech Recognition
This is the golden formula in the speech recognition.

The argmax function means find the value of w that makes p(x|w) maximum. Here x is observation acoustic signal. So basically we compute all possible sequence and then for each one of them calculate the possibility of seeing such an acoustic signal. This is a very computation intensive process but by using HMM and CTC we try to minimize searching space. The process of guessing the correct sequence is called decoding in the speech recognition research field.
Transition Matrix
HMM is just bunch of states that transition from one state to the other. These would be called on every emitting transitions and all of them can be expressed in a matrix that would be called transition matrix.

| • Occupation counts: |
.occs It’s the per-transition-id occupation counts. They are rarely needed. e.g. might be used somewhere in the basis-fMLLR scripts. |
| • FMLLR: |
An acoustic feature extraction technique like MFCC but with focus on multi-speaker adaptation. |
| • Beam: |
Cutoff would be Best Cost–Beam (Around 10 to 16) |
| • Deterministic FST: |
A FST that each state has at most one transition with any given input label and there are no input eps-labels. |
Questions
- Why to use -logarithm probabilities: For numerical stability.
- What’s the difference between WFSA and WFST: Acceptors only have output, but transducers have input and output
- sometimes in implementation We implement WFSA as WFST But all nodes have same input and output This is done to simply implement WFSA using normal WFSA without changing the implementation
- What are the input and output nodes in WFST: Inputs are usually phoneme and outputs are words and usually along the way of phonemes, the output is just empty or epsilon except final node

- OxinaBox Kaldi-Notes Train
- VpanaYotov: Decoding graph construction in Kaldi: A visual walkthrough
- Jonathan-Hui Medium: Speech Recognition GMM-HMMl
- Mehryar Mohri: Weighted finite-state transducers in speech recognition
Published on 2024-01-27 in
Android
Preloader: initial bootloader code that runs when the device is powered on.Vbmeta: Verified Boot metadata, which is used to verify the integrity of the boot image.Vbmeta_system: Verified Boot metadata for the system partition.Vbmeta_vendor: Verified Boot metadata for the vendor partition.Spmfw: Secure Partition Manager firmware.Lk: Little Kernel bootloader.Boot: kernel and ramdisk images used to boot the device.Dtbo: device tree binary object.Tee: Trusted Execution Environment.Efuse: MediaTek Specific Data for RF Parameters and other chip-specific properties.Super: metadata for all dynamic partitions on the device.Cust: A partition that contains customer-specific data.Rescue: A partition that contains a recovery image that can be used to restore the device to its factory state.Userdata: user’s data, such as apps, photos, and documents.
Published on 2024-01-27 in
Android,
Software
Scatter File
To use the SP Flash tool you need to have a scatter file. One easy way to find that is to look out for other devices that use the same chipset but the manufacturer releases the firmware file including the scatter file one such manufacturer is Xiaomi but you may find other manufacturers as well.
Samsung Galaxy A34 uses Dimensity 1080[MT6877v] and here is the list of other devices that use this chip as well:
UFS Or eMMC
Devices come in two kinds, eMMC and UFS. eMMC is just an SD card but in a package of a chip which then is called an embedded SD card or eMMC. Others come with UFS storage which is NAND flash in fancy words. You can determine your device type by looking at the specs. For A34 that is UFS 2.2.
Partition Starting Address
There’s a PIT (Partition Information Table) file inside all Samsung firmware. This file includes all partition starting addresses. Don’t know how to read it yet though
Small Notes
- If you are creating a scatter file from scratch know that you should put all partition inside and all correct start addresses. SP Flash Tool every time you flash even a single partition will update the device gpt partition table based on the scatter file you supplied thus be careful or backup the ptable before starting messing around
- Would be awesome if anyone knows a tool which can read the ptable, currently I used mtkclient but the support is not that great
- SP Flash Tool
By SRAM, By DRAM option, choose how the file was first copied to the device and then write to the actual location. Both should work in normal conditions, SRAM used if DRAM has issues, pro during R&D.
Published on 2024-01-23 in
Android,
Software
Half of Samsung devices come with a MediaTek chip. These chips come with a special mode called BROM or emergency mode. This is something that by default is not enabled but if the device goes into broken mode it will activate to allow the device to be flashed without the need for a jtag connection.
There’s a tool called Android Utility Tool that comes with a very shitty support, website, and documentation. In my journey, I thought I give it a shot as the phone that I was playing with wasn’t so important to me. Unfortunately, I used the tool to put my device into the BROM mode and the device got bricked with a black screen and no reaction whatsoever.
The solution was easy just get a stock ROM extract Bootloader files uncompress the LZ4 file format and then use the write boot_section and write a preloader file to the device. And your device will work revive again.
Final note MediaTek mode only enables for a few seconds after you reboot the device so each time you want to execute an action you have to keep Holding the power button or some combination for a few seconds or more.